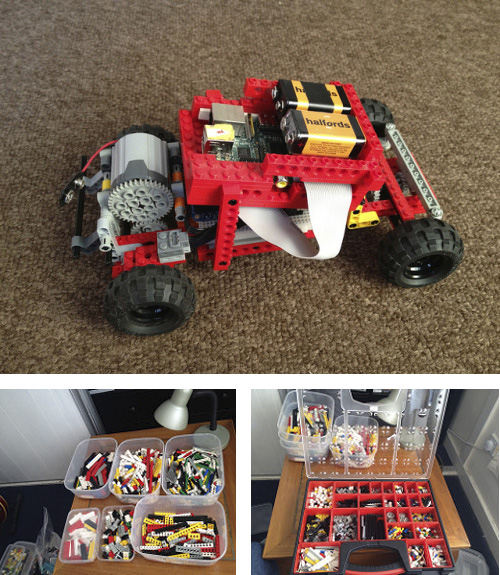
Edit: See the Lego/Raspberry Pi project on Flickr for a photo diary of the construction process.
When I was a child I always wanted a remote control car. I never got one – usually my parents convinced me that the novelty would wear off in an hour, and that it wouldn’t be worth the expense. (They were probably right). I usually opted for a safer videogame-based option at Christmas time, and on my birthday I’d ask for Lego.
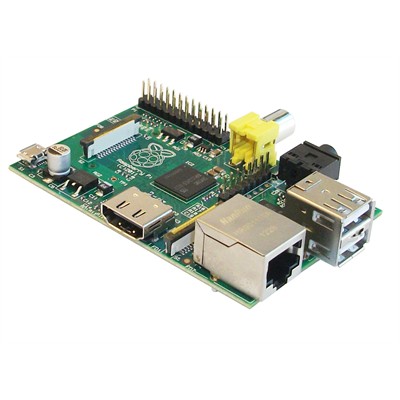
The Raspberry Pi – a tiny, low-power computer that fits in the palm of your hand – provided the inspiration for a project to finally put that right. Using bricks from my childhood Lego collection, and a wireless Xbox 360 controller from my teenage years, at long last I could hack together a remote control car! How hard could it be?
Not exactly simple
I’m a programmer by trade, but any knowledge of electronics learned during University apparently died at graduation. The necessary software configuration and ~200 lines of Python coding took very little time. The fairly simple circuitry took a long time, and caught fire on several occasions. Your mileage may vary.
There have been similar attempts to control RC cars from an Xbox controller:
- Dan from Chicago put a Netduino controller on his car which connects via his laptop.
- Keegan at jedibowler.com used Netduino on the car as well, and has a PC on the floor issuing commands.
This project takes it a step further because the Raspberry Pi is a complete computer, so all the hardware lives on the car. There is no need for a laptop issuing commands over Wifi.
Building the Chassis
The design of the chassis aims to be as simple and robust as possible.
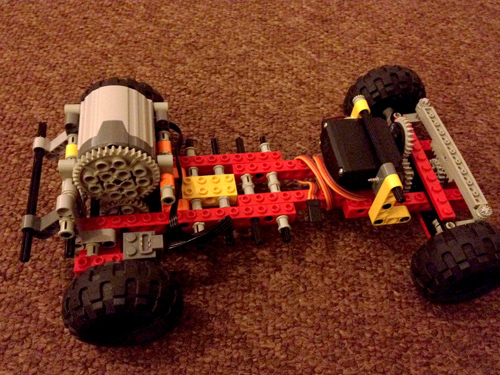
No, really, robustness is key. Some observations:
- Use Technic clip-joints and axles through everything.
- Using Lego studs to join any two parts of the chassis was a waste of effort. Shearing stress pulls them apart easily.
- Servos and motors would rather pull the Lego apart than turn the wheels. They need to be very firmly held in place.
Two motors are required:
- The steering is controlled via a high torque 180 degree Towerpro servo from AdaFruit. A Lego gear is attached with superglue.
- The rear axle is attached to a Lego Power Functions XL-Motor.
 Originally I used an old 9V Technic motor, but it wasn’t strong enough to turn the rear axle. There’s a fascinating analysis of Lego motors on philohome.com which suggests that the newer motor has around 40 times more torque. I purchased one online for just $10.
Electronics and Soldering
The motors are controlled via PWM (Pulse Width Modulation) using the excellent Adafruit 16-channel PWM driver.
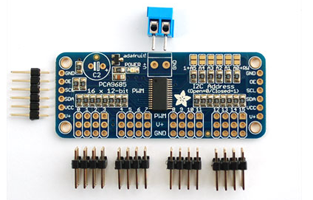
The tutorials on Adafruit’s website are truly exemplary, and in less than an hour I had the Raspberry Pi controlling motor speed and servo rotation.
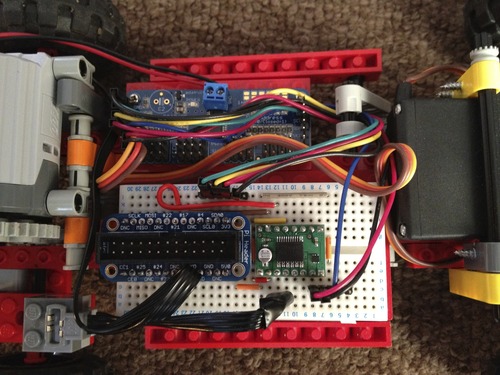
The above shot demonstrates circuitry mounted onto the chassis.
- Adafruit’s Cobbler Breakout Kit is used to connect the Raspberry Pi to a prototyping plug-board.
- The i2c connectors (
SDA0andSCL0,3v3andGND) are then connected to the PWM driver. - GPIO pins
21and17are connected to a cheap H Bridge chip, specifically the TB6612FNG from pololu.com. This will drive the main motor forwards or backwards. - Output
0on the PWM driver runs into the H Bridge. This controls the main motor’s speed. - Output
1on the PWM driver runs to the steering servo.
Software
Finally, the Raspberry Pi must be loaded with some software which translates Xbox controller buttons into motor speed, motor direction, and steering rotation.

The Xbox 360 Wireless Gaming Receiver for Windows is required to connect the controller. Microsoft use a custom wireless protocol, so a regular Bluetooth modem will not work. This bulky device consumes quite a lot of power, but at least it is relatively inexpensive.
“For Windows” should not be taken too seriously. Ingo Ruhnke’s excellent Xbox/Xbox 360 USB Gamepad Driver for Linux is a perfect solution for hooking up the wireless USB device, and it installs in seconds on a Raspberry Pi running Ubuntu.
At last, I can get back to programming! I hacked together a couple of Python modules to:
- Run
xboxdrvas a subprocess, which connects to the controller. - Read from the
stdoutpipe as it constantly prints out the controller state. - Watch for changes in
LT(left trigger),RT(right trigger) andX1(left thumbstick). - Update the outputs as appropriate through Adafruit’s libraries.
For example, to control the steering:
# Left thumbstick controls the steering

if event.key=='X1': steer = int( servoMid +
(servoWidth*-event.value)/32768 ) pwm.setPWM(1, 0, steer)
The complete software kit is available in a repository on Github.
Completion
Here’s my DIY-RC-Car in action. Enjoy!